

During our recent TOPS Pro event, there were some features that were hot training topics for customers and so we thought we’d bring you a quick summary here in case you were keen to implement them in your load patterns too:
Applying Bulge & Compression in TOPS Pro
Bulge and compression can be applied as required throughout the package design stages in TOPS Pro. You can factor in an element of bulge or compression at each stage enabling you to represent the accurate dimensions of products, cases and pallets in the package design.
Bulge can be measured as a positive or a negative amount (see below for a full explanation). A number of dialog boxes allow you to account for a bulge or compression factor as you define the parameters for an item (e.g. bottle, can, shipcase, etc).
As an example, consider the Shipcase Options dialog box shown below which allows you to represent the size dimensions of the case by expressing bulge as either a positive or negative amount. For the case this can be either expressed as a percentage of the case (useful if TOPS Pro is designing a new case) or by a specific value.
If a container expands when you fill it with product, the result is a positive bulge. If a container is compressed when it is packed, the result is a negative bulge. The bulge factor allows you to shift the amount of space a container takes up without changing its reported size. Let’s consider two examples showing how this works in TOPS Pro.
Positive Bulge
A 1 litre bottle of bleach may have a designed diameter of 100mm. However, once the liquid is poured into the bottle, the bottle may expand (bulge) another 2mm. By adding a bulge of 2mm along the diameter of the bottle, TOPS Pro will design the bottle and packaging around it as if it has a diameter of 102mm, but will report its size as a 100mm bottle.
Negative Bulge (Compression)
Suppose you are packing rolls of paper towels into a shrinkwrap; each roll has a diameter of 150mm. However, once the rolls are packed they might compress up to an 10mm, resulting in a negative bulge of 10mm. TOPS Pro will report the rolls as having a 150mm diameter, but in fact the rolls will take up only 140mm in the shrinkwrap.

Using Secondary Pallet Patterns
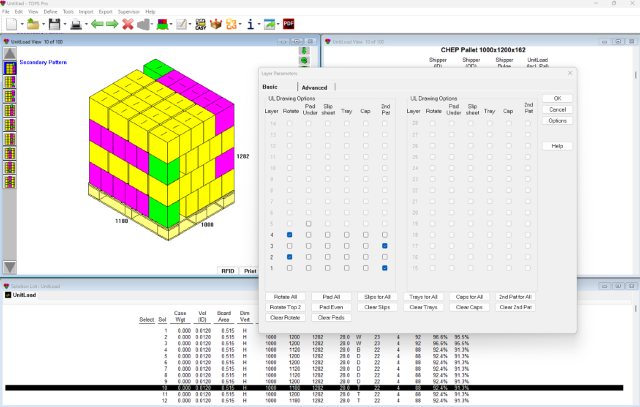
The “secondary pattern” is used to create mixed-layer pallet patterns. These are alternating layer pallet patterns in which some of the layers may be “borrowed” from other pallet patterns. Some of our customers like to do this, so here’s how to use this feature:
- Select a pallet pattern to use as a secondary pattern from the Unitload solutions list. This pattern cannot have used the “Multi-dimension” pattern option.
- Open the Edit menu and click Select as Secondary Pattern. Text appears in the unitload view window to confirm.
- Now view another solution from the solution list.
- Open the Edit menu, select Layer Parameters, then select which layer(s) you want to use as Secondary Pattern as shown below in the ‘2nd Pat’ column).
- Once applied you will see the pallet with the secondary patterns as specified.
Note that the statistics will still reflect the original unitload before mixing of the layers.
Setting Up an Analysis Template
TOPS Pro allows you to setup templates for analyses that you frequently perform. For example you may deliver on several types of pallets with different allowed maximum heights for multiple customers. You can, for example, create a template for a CHEP pallet, with 1600mm maximum build height with cases allowed to stack any way up on the pallet. By simply selecting a predefined case (or entering the product dimensions) and clicking calculate, your pallet pattern in generated to your pre-defined template.
This greatly speeds up and simplifies data entry. It also avoids errors and means you can create package designs, pallet patterns etc. using just a few clicks.
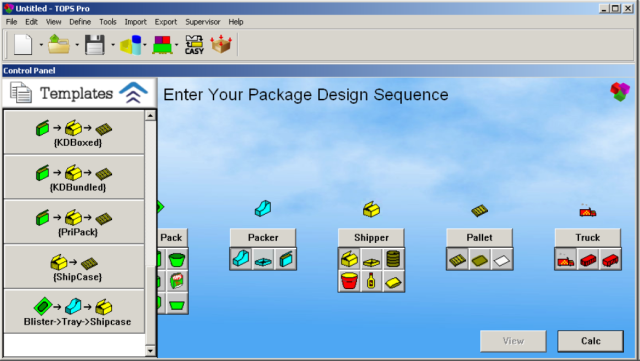
You can save these in the template toolbar to the left of the Control Panel. When you click on a template button, TOPS Pro will automatically insert the corresponding icons in the package design sequence and open the parameters dialog box for data entry.
To set up an analysis template, start from the Menu Bar:
- Select Template Setup from the Supervisor menu. The top portion of the Control Panel will have a red background. You are now in “edit template” mode, which allows you to open, save and change templates.
- Create a design sequence for an analysis in the usual way. In the example below, we are creating a template for blister packs that will go into shipcases and then onto pallets. Change any parameters in each stage of the design that you want to be saved as part of your template.

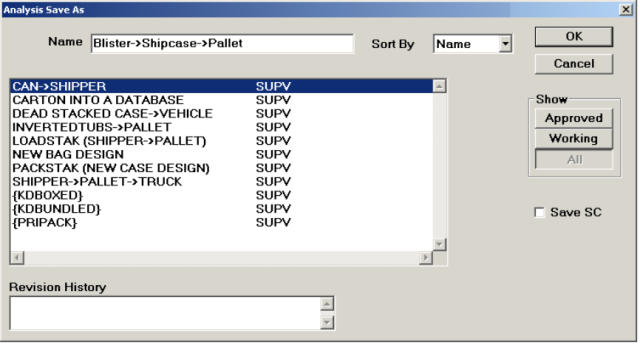
3. To save the design sequence and parameters as a template, go the File menu and select Save As Template.
4. Enter the name for the template in the Name field and click OK to return to the Control Panel.
5. Click “Exit templates.”
6. The new sequence will now be available in the Template Toolbar or when you choose ‘New via Template’.
Note that if you login as Supervisor before starting this process then the template will be available for all users on the network.
Deleting an Analysis Template
To delete an existing template, you will need to login as Supervisor.
- Go to the Supervisor menu, select Login/Logout.
- Enter password “tops software” and click Login.
- Go to File menu and select New via Template. The Open Analysis dialog box opens.
- Highlight the template to be removed and click the Delete button.